
Motivations #
The out-of-the-box Part Catalogs supplied by Civil 3D are very limited. So, you develop your own Gravity Pipe Networks and Pressure Pipe Networks catalogs to be used not only on your machine but also across other machines in your office.
This guide explains how you can use different Part Catalogs for Pipe and Pressure Networks in your drawing. It also shows you how to properly transfer those Part Catalogs to other machines.
Create the Part Catalogs #
The first step is to create the Part Catalogs (which we will explore in our upcoming posts). Zip them into a .zip file and copy it to the destination user’s machine.
Define New Part List in Style Setting #
Part Lists and Pressure Part Lists can be considered turbo-charged Styles, meaning they can be made into templates and then imported into new DWG drawings just like styles.
To make your catalogs easily transferrable to other drawings or machines, you need to create new (Pressure) Parts Lists and save them as Civil 3D Templates (.dwt format).
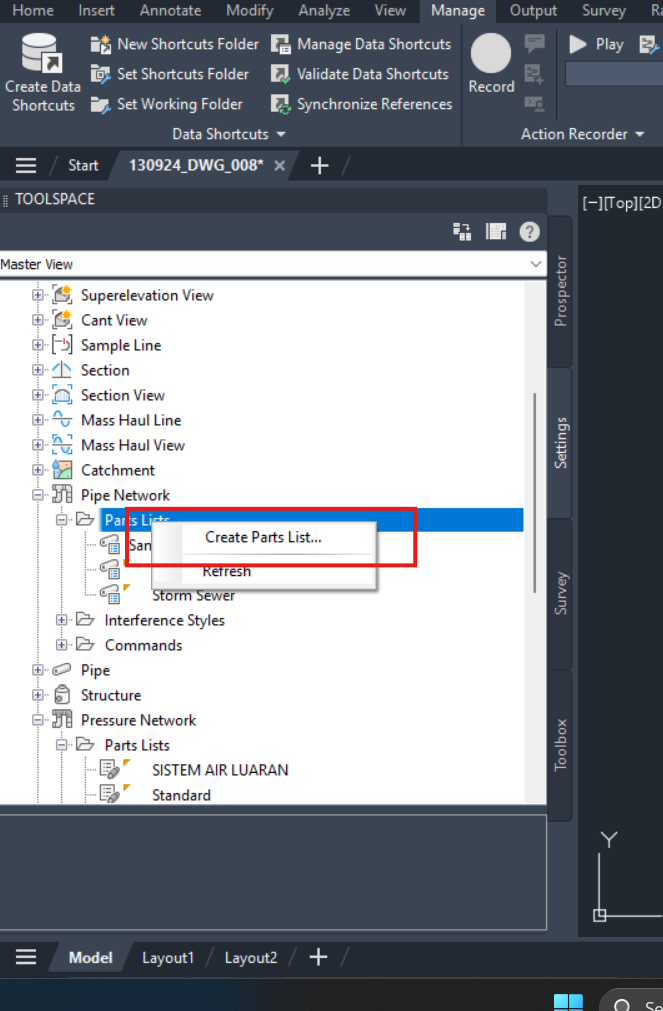
Create New Gravity Parts List as a Style #
Go to:
Toolspace → Settings → Pipe Network → Parts Lists → Create Parts List
Then, Add Part Family to the New Parts List:
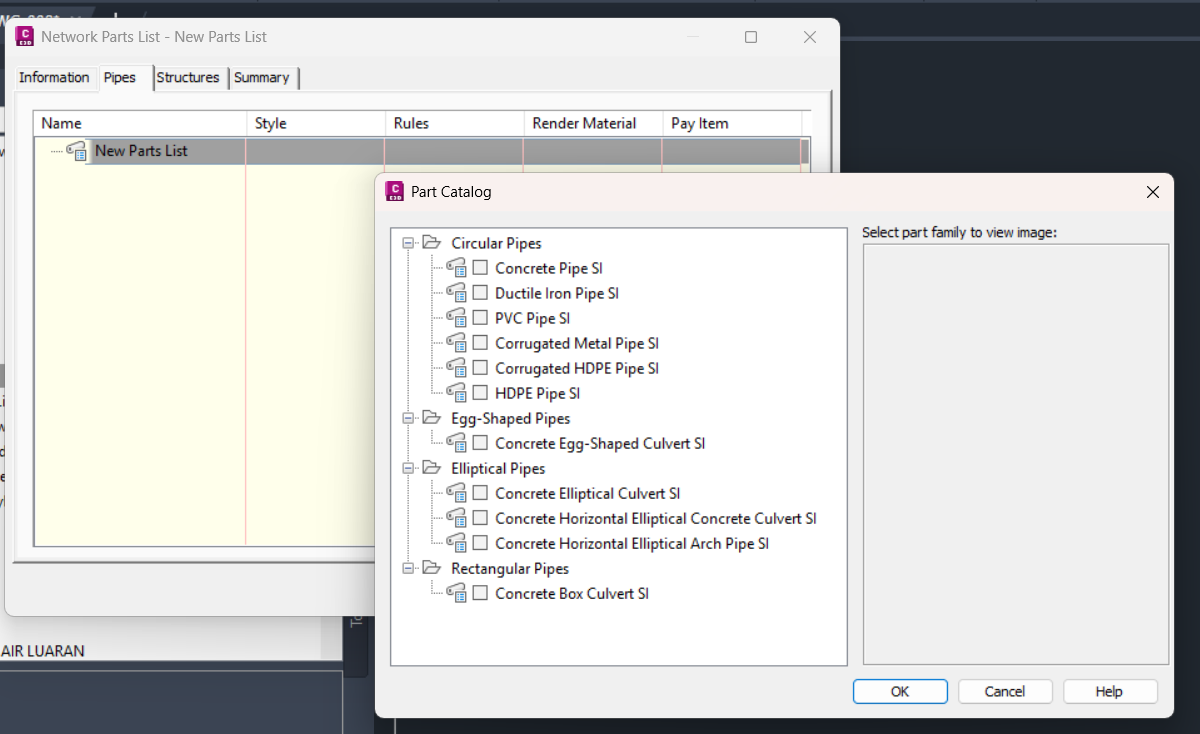
Select the Part Family you want to add to the Parts List.
Note:
- The Part Size in the Part Family is just a reference to the actual part size in the catalog. This is why you need to distribute the catalog to other machines if you want users there to use it successfully.
- The Part Families available for you to add to your Parts List depend on the prevailing Part Catalog you set.
Create New Pressure Parts List as a Style #
Go to:
Toolspace → Settings → Pipe Network → Parts Lists → New
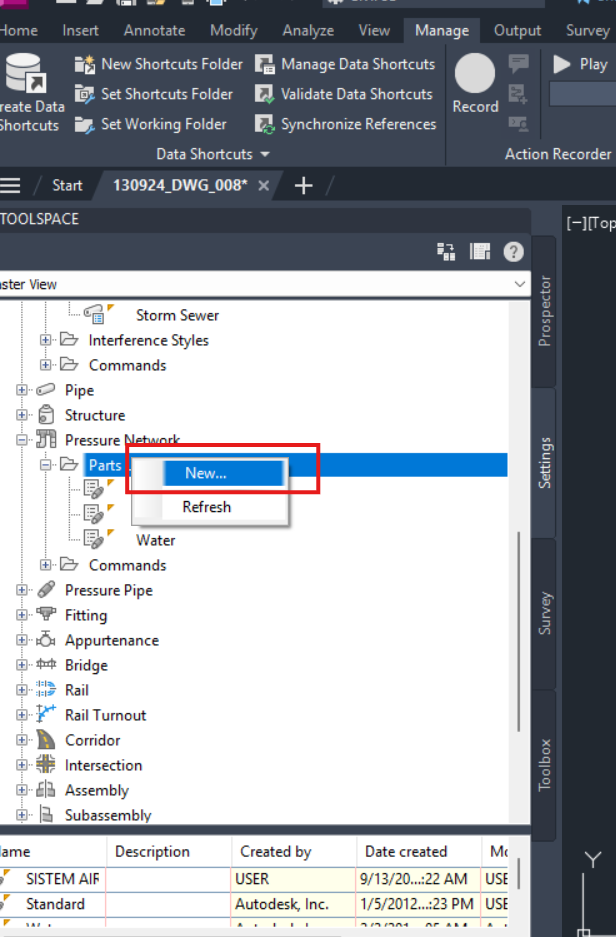
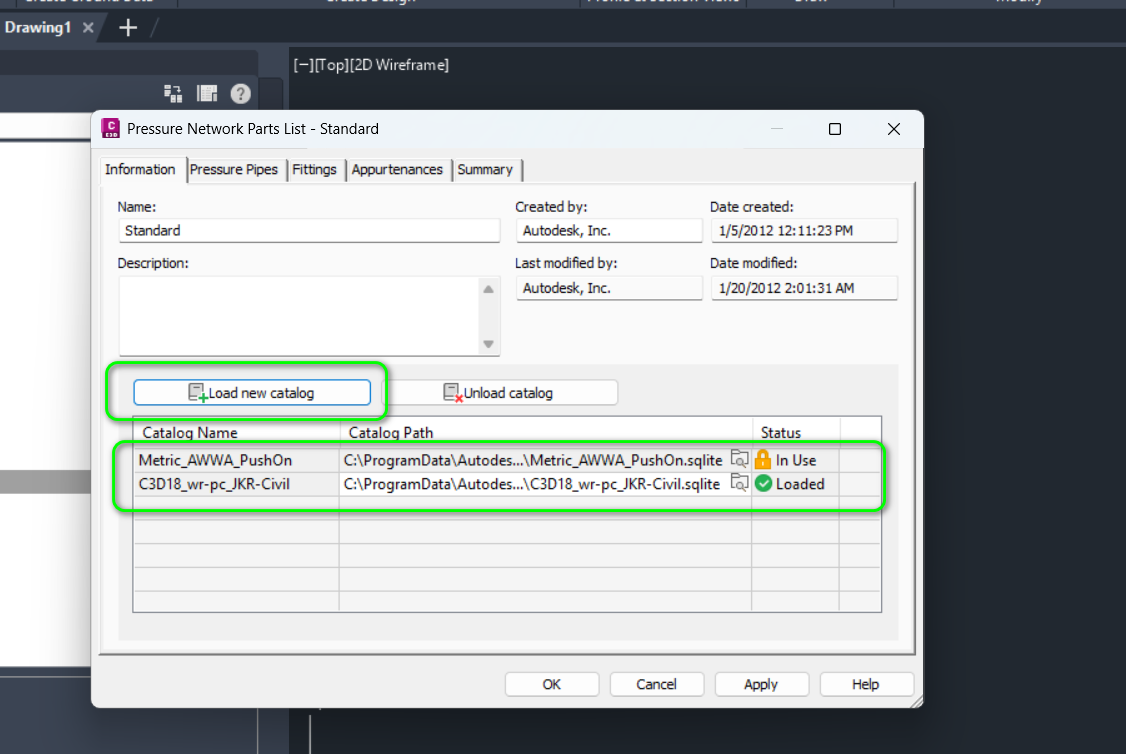
The first thing is to add the Custom Catalog that you create to the Parts List. Unlike Gravity Part List, Pressure Part List allows you to load multiple catalogs for the Pressure Part Family via the Information tab:
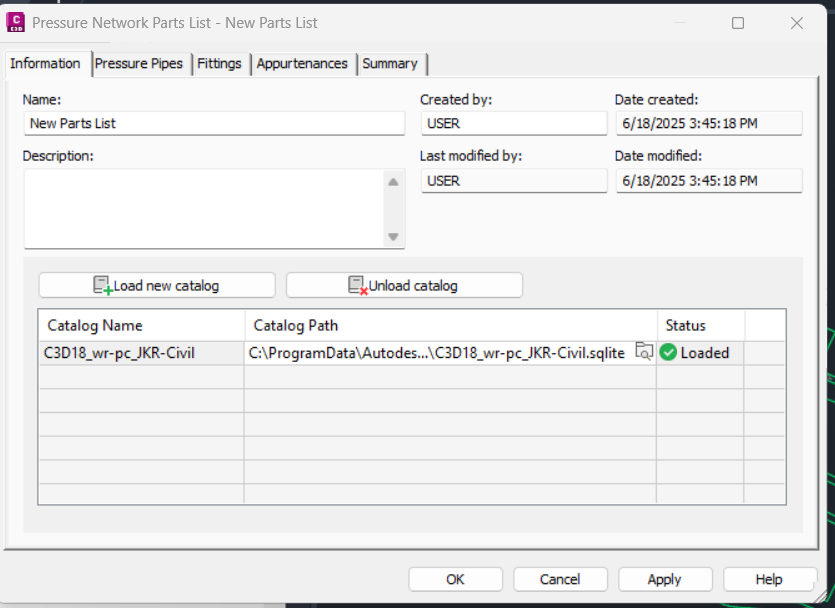
After loading your own catalog, you can select the Part Family to add to the Style. The process is the same as for the Gravity parts, so it won’t be repeated here.
After you add the Part List, remember to save your drawing as a template (.dwt file extension) so you can copy the template to the destination user’s machine for creating new drawings.
Transferring the Catalog and Part List to Another Machine #
You can choose to put the new catalog that you develop under the default catalog folder, or you can put it at any other folder.
Under default location #
Get the zipped files that contain all of the Catalog resources, and place them under the following folders according to the folder hierarchy on the original machine:
-
Gravity Pipe Networks:
%ProgramData%\Autodesk\C3D xxxx\enu\Pipes Catalog -
Pressure Pipe Networks:
%ProgramData%\Autodesk\C3D 2025\enu\Pressure Pipes Catalog\Metric
Note that the above are the default place where Catalog will be read.
Put new catalog in your own folder #
You may not want to put the catalog in the above default catalog folder location, and you may want to put it in another drive all together, say, at D:\Catalogs\Gravity and D:\Catalogs\Pressure. This is how you can do it.
For gravity part catalog folder, e.g. the D:\Catalogs\Gravity, you need to seed it with the catalog related content first, by copying everything from %ProgramData%\Autodesk\C3D 20xx\enu\Pipes Catalog into that folder. Civil 3D needs your part catalog folder to be at the directory as folders such as xsl, Aecc Shared Content, css, Images, js as per below for it to fully work.

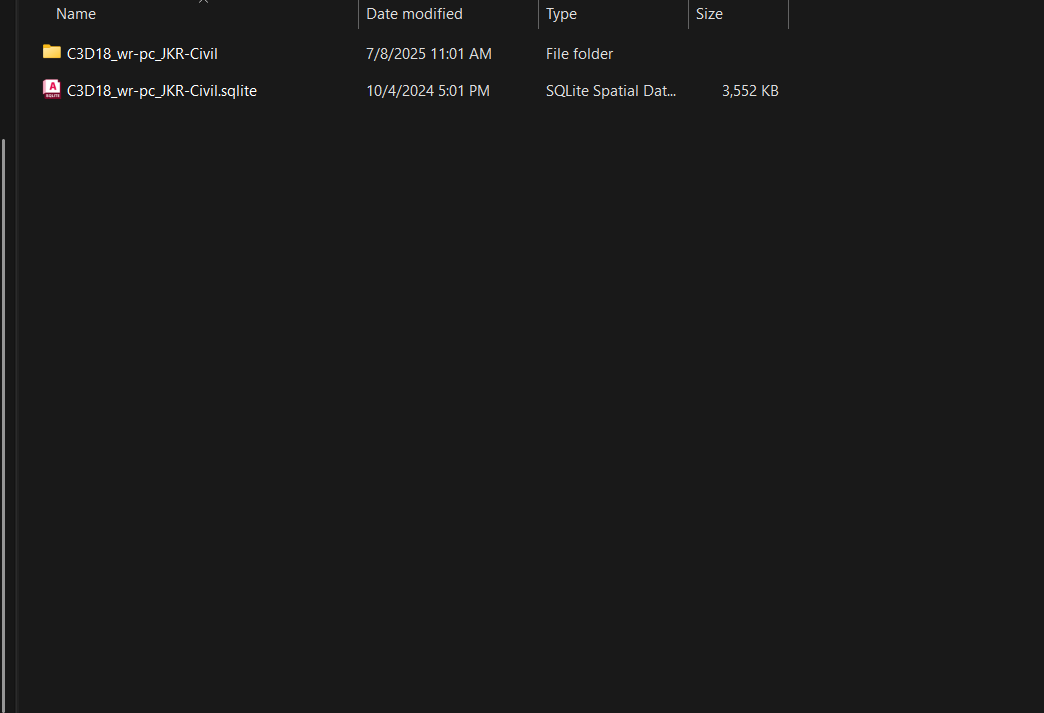
For pressure part catalog folder, e.g. the D:\Catalogs\Pressure, you just have to ensure that the .sqlite and the pressure catalog folder is located within it, as shown below.
No need to preseed it with any content
Using the new catalog in production drawing #
Then, import the .dwt template file into the new production drawing, as per the guide here.
For Gravity Pipe Networks, there is one additional step: you will need to set the Part Catalog correctly on a per-machine basis.
For Pressure Pipe Networks, no additional step is required. The Pressure Part List can contain multiple catalogs, and the file location of these catalogs is stored inside the template, so Civil 3D can easily locate them.
Troubleshooting #
This is a troubleshooting guide for those who can’t use the part size from your catalog on other machines but not on the machine that develop it.
- First, you have to ensure that the Part Catalog is correctly, 100% copied to the related folders in
%ProgramData%\Autodesk\C3D 2025\enu\. This is more often than not, the problem. - If you can ensure that the Part Catalogs are copied over correctly, then make sure that the
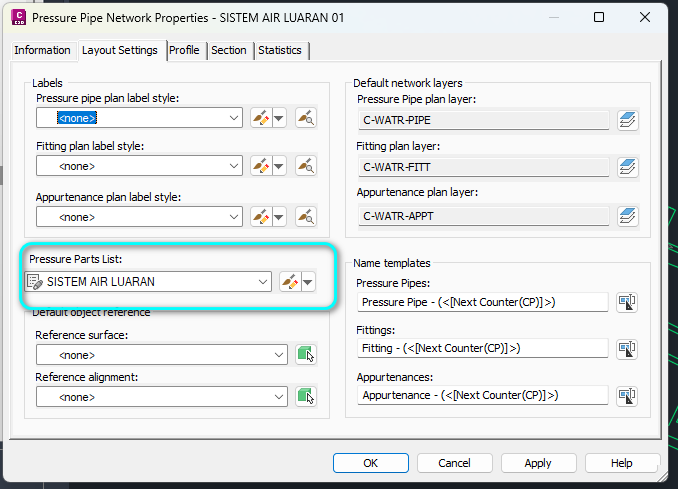
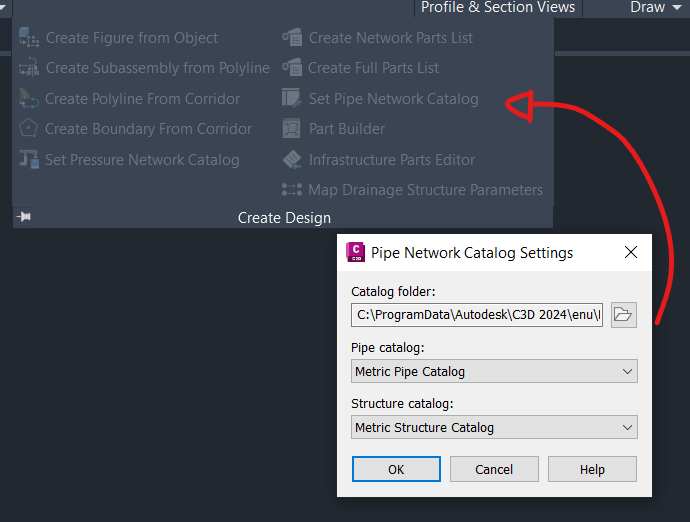
Part Listthat you assign to your Network is correct, as shown in the below images
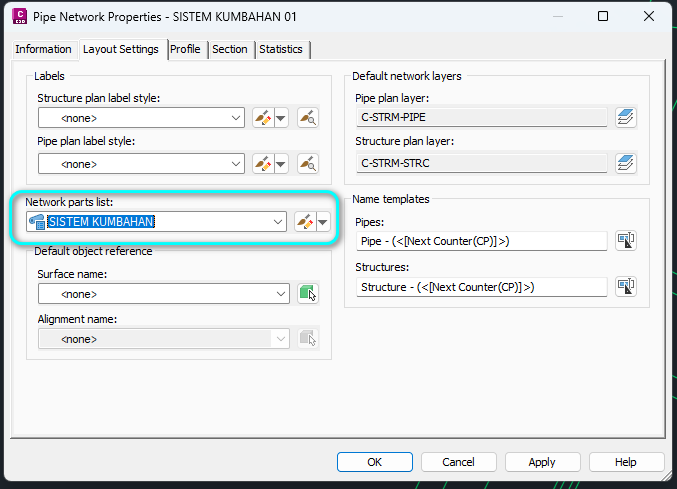
- For Gravity Pipe Network, you will have to make sure that the Pipe Network Catalog is set correctly, as shown below:
- For Pressure Pipe Network, you have to ensure that all the Part Catalogs referenced is available, ie: there is no “Missing” status. Everything has to be either in use or loaded

My passion is in sharing knowledge — Civil 3D or otherwise– with the world.
I’m also the benevolent dictator for life at MES Innovation Sdn Bhd.


